


Hyperlite Parts

Hyperlite Curves

Connector Curves

Baseplate

All pieces constructed of steel and powdercoated. Custom items available.
Infill Options – Fabric Panels, Panel Graphics and Slatwall

Rollable lexan full graphic panels adhere easily with magnets on the reverse, using a 3/4″ bar, that slides into the extrusion channel.
Fabric panels are available with full graphics, applied logos, or solid colors. Attaches to truss simply with our “invisible” clips, for a smooth, seamless look.
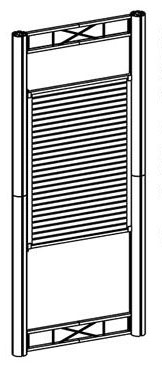
23″W x 45″H slatwall mounts between uprights, and is made of lightweight aluminum with a durable powdercoat finish.
Our slatwall accepts all standard merchandising. Shelving, retail hanging and merchandising accessories are available.
Slatwall Unit
HP-SW2
Hyperlite Assembly Instructions

Assembling Hyperlite is quick and easy.
First, install the bottom trusses between the lower half of the uprights. The bottom of the bottom connection should be flush to the bottom of the extrusion. Both should be on the floor with the truss 1/2″ off the floor.
Next, insert the extrusion connector into the top of each upright and then slide the top half of the upright over the connector. Insure all the channels are properly aligned and tighten the screws.
Finally, install the top trusses. The top bracket has a bend at the top so the truss will be flush to the top of the upright. Tighten the wingnuts and you’re ready to install your graphics!